
Crafter Build: From Arrival to Adventure
When I relocated to Australia, I was immediately drawn to the VW 4Motion Crafter. It had the look and functionality I wanted, closely resembling the Sprinter but at a considerably lower price. Plus, if I’m honest, I’ve always preferred the VW Crafter's body lines. Previously, I had a black, low-roof, two-wheel-drive Crafter. The 4Motion was on backorder for over three years, so I had to make do until it finally arrived on July 11th 2024.

Ironically, my new 4Motion Crafter arrived on July 11th—my 44th birthday. Seeing it front and center at Cricks Volkswagen was an incredible feeling. Driving it home, I was thrilled but also eager to get started on the build. I had a vision: a well-rounded van that would cater to our adventures—whether it’s moto, mountain biking, or family outings—and keep everything organized and comfortable for our family of five.


The build journey started with some initial prep work. I ordered a plywood floor and a back seat for the van, mistakenly believing they were factory-installed. However, it turned out these were subcontracted to a local company, Van Mods. Before dropping it off, I took the time to insulate and lay down rubber under the floor to minimize squeaking. When I got it back, the seat matched the front perfectly, but the plywood floor install left something to be desired. The cuts were rough, and the end of the floor lacked stainless edging. Nevertheless, it was functional and allowed us to start using the van.


Next, I tackled the sidewalls, wheel well boxes, L-track, and ceiling. With family and work commitments, time was tight, so I enlisted the help of mountain bike enthusiast Brent Rees. Between his training sessions, Brent worked on the van, starting with a plank flooring ceiling in light grey—an approach we’d used on my previous van, which turned out beautifully.


For the mid-wall and floor, I wanted to use RB Components Coin flooring for its durability and easy cleaning, but it wasn’t available in Australia. Instead, I opted for a similar material from Clark Rubber, a small dimpled rubber/plastic meant for garages and workshops. Brent cleaned up the Van Mods floor, and I installed heat tape and insulation to ensure the van would stay quiet and maintain temperature.


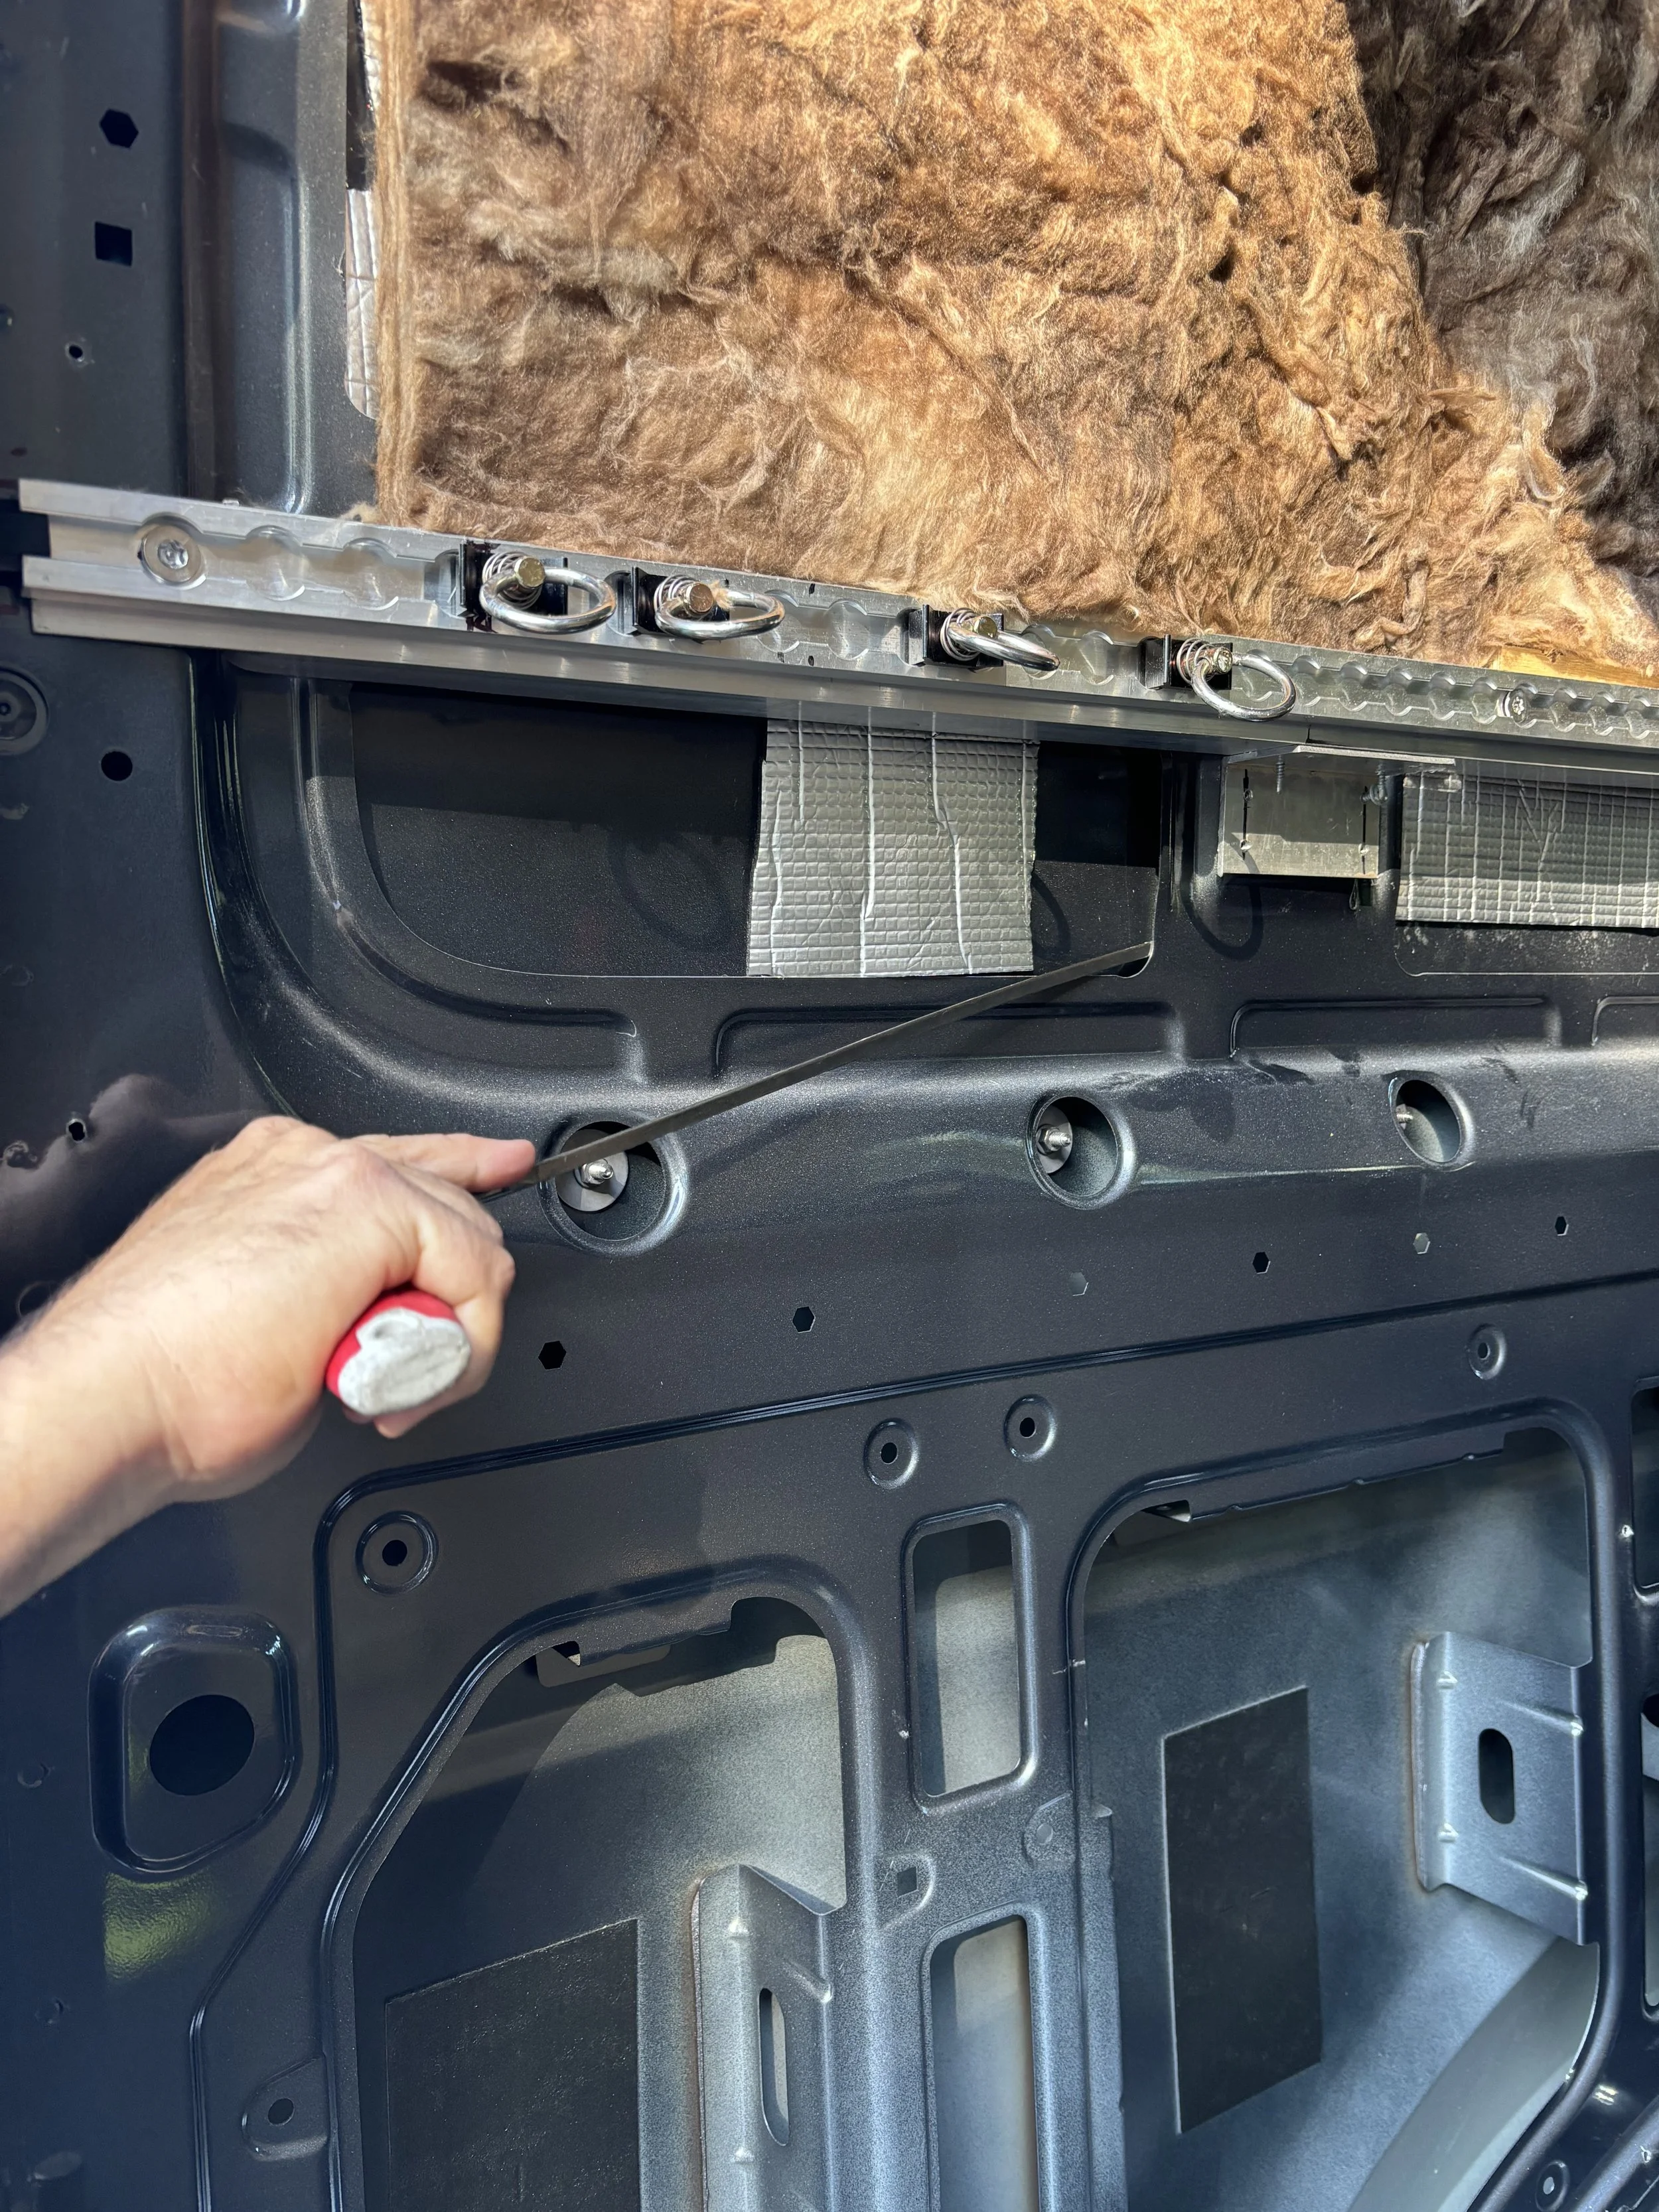
Brent’s attention to detail was impeccable. After a full day, he had the plank ceiling completed to my satisfaction. For the sidewalls, we had to plan for a panel bed supported by L-track. This required installing an alloy brace into the van and then using rivnuts to secure the L-track, which would support the weight of the panel bed. I’ll dive into the specifics of the panel bed setup later. This brace is available at company’s like RB components to put you panel bed at the height you want you panel bed.


We first measured the height needed for bicycles to fit underneath the bed, then mounted the L-track. The plywood was installed above and below the L-track. The second L-track was mounted at the top of the wall, near the ceiling. Brent completed all the woodwork, including the wheel well boxes, and then we disassembled everything to lay the dimple rubber. We cut the rubber to fit while in the garage, ensuring a precise installation.


DIY with my wife didn't turn out so bad.
It was time to tackle the upholstery for the upper walls, and I initially considered hiring a company to ensure a flawless finish due to time constraints. However, after receiving a quote of around $4,000, I discussed it with Sarah. I realized I actually enjoyed the process, and Sarah was enthusiastic about helping out to save some money.
After work one evening, we set to work in the garage, using foam and a tweed-style fabric from Spotlight here in Australia. The transformation was incredible. As I stepped back to admire our work, I felt a deep sense of satisfaction with the result. The combination of foam and tweed created a refined, cozy look that exceeded my expectations.
With the main walls now beautifully upholstered and the space feeling cozy, I faced the challenge of addressing the intricate details like the window trim and the D bars around the doors. These were a bit beyond my upholstery skills, so I decided to revisit the upholstery specialist who had initially provided a quote. He offered a fantastic price to handle the trim work using vinyl, which was just what I needed. The professional touch he brought to those detailed areas really completed the interior, giving it a polished, cohesive look that tied everything together perfectly.
With 90% of the upholstery complete, it was time to shift focus to the electrical work. I opted to postpone installing an inverter and battery system for now and decided to use the Jackery power system instead. This choice allows me to manage my energy needs efficiently while I assess whether a more permanent power solution will be necessary in the future.
The Jackery power bank has proven to be an excellent product, offering reliable performance and convenience. If you're unfamiliar with it, I highly recommend checking it out. Click HERE to learn more about how it can benefit you.
At this point I’m saving my pennies but there are a few things I could do to add details. Plastidip is a great little hack to blackout the badges and add some of your style to your van so utilised the Plastidip product to blackout the VW badges. The other thing I did was grab the spray can of semi gloss black and did the wheels until I get my Method Race Wheels wrapped in Toyo Tires.


So this is where I’m at with my dream van as of August 27th. Below is a list with embedded links of products I have used and products to come but I’m so stoked on where I’m at with the Van thus far. Stay tuned for more information on the build to come soon.

Update September 5th 2024
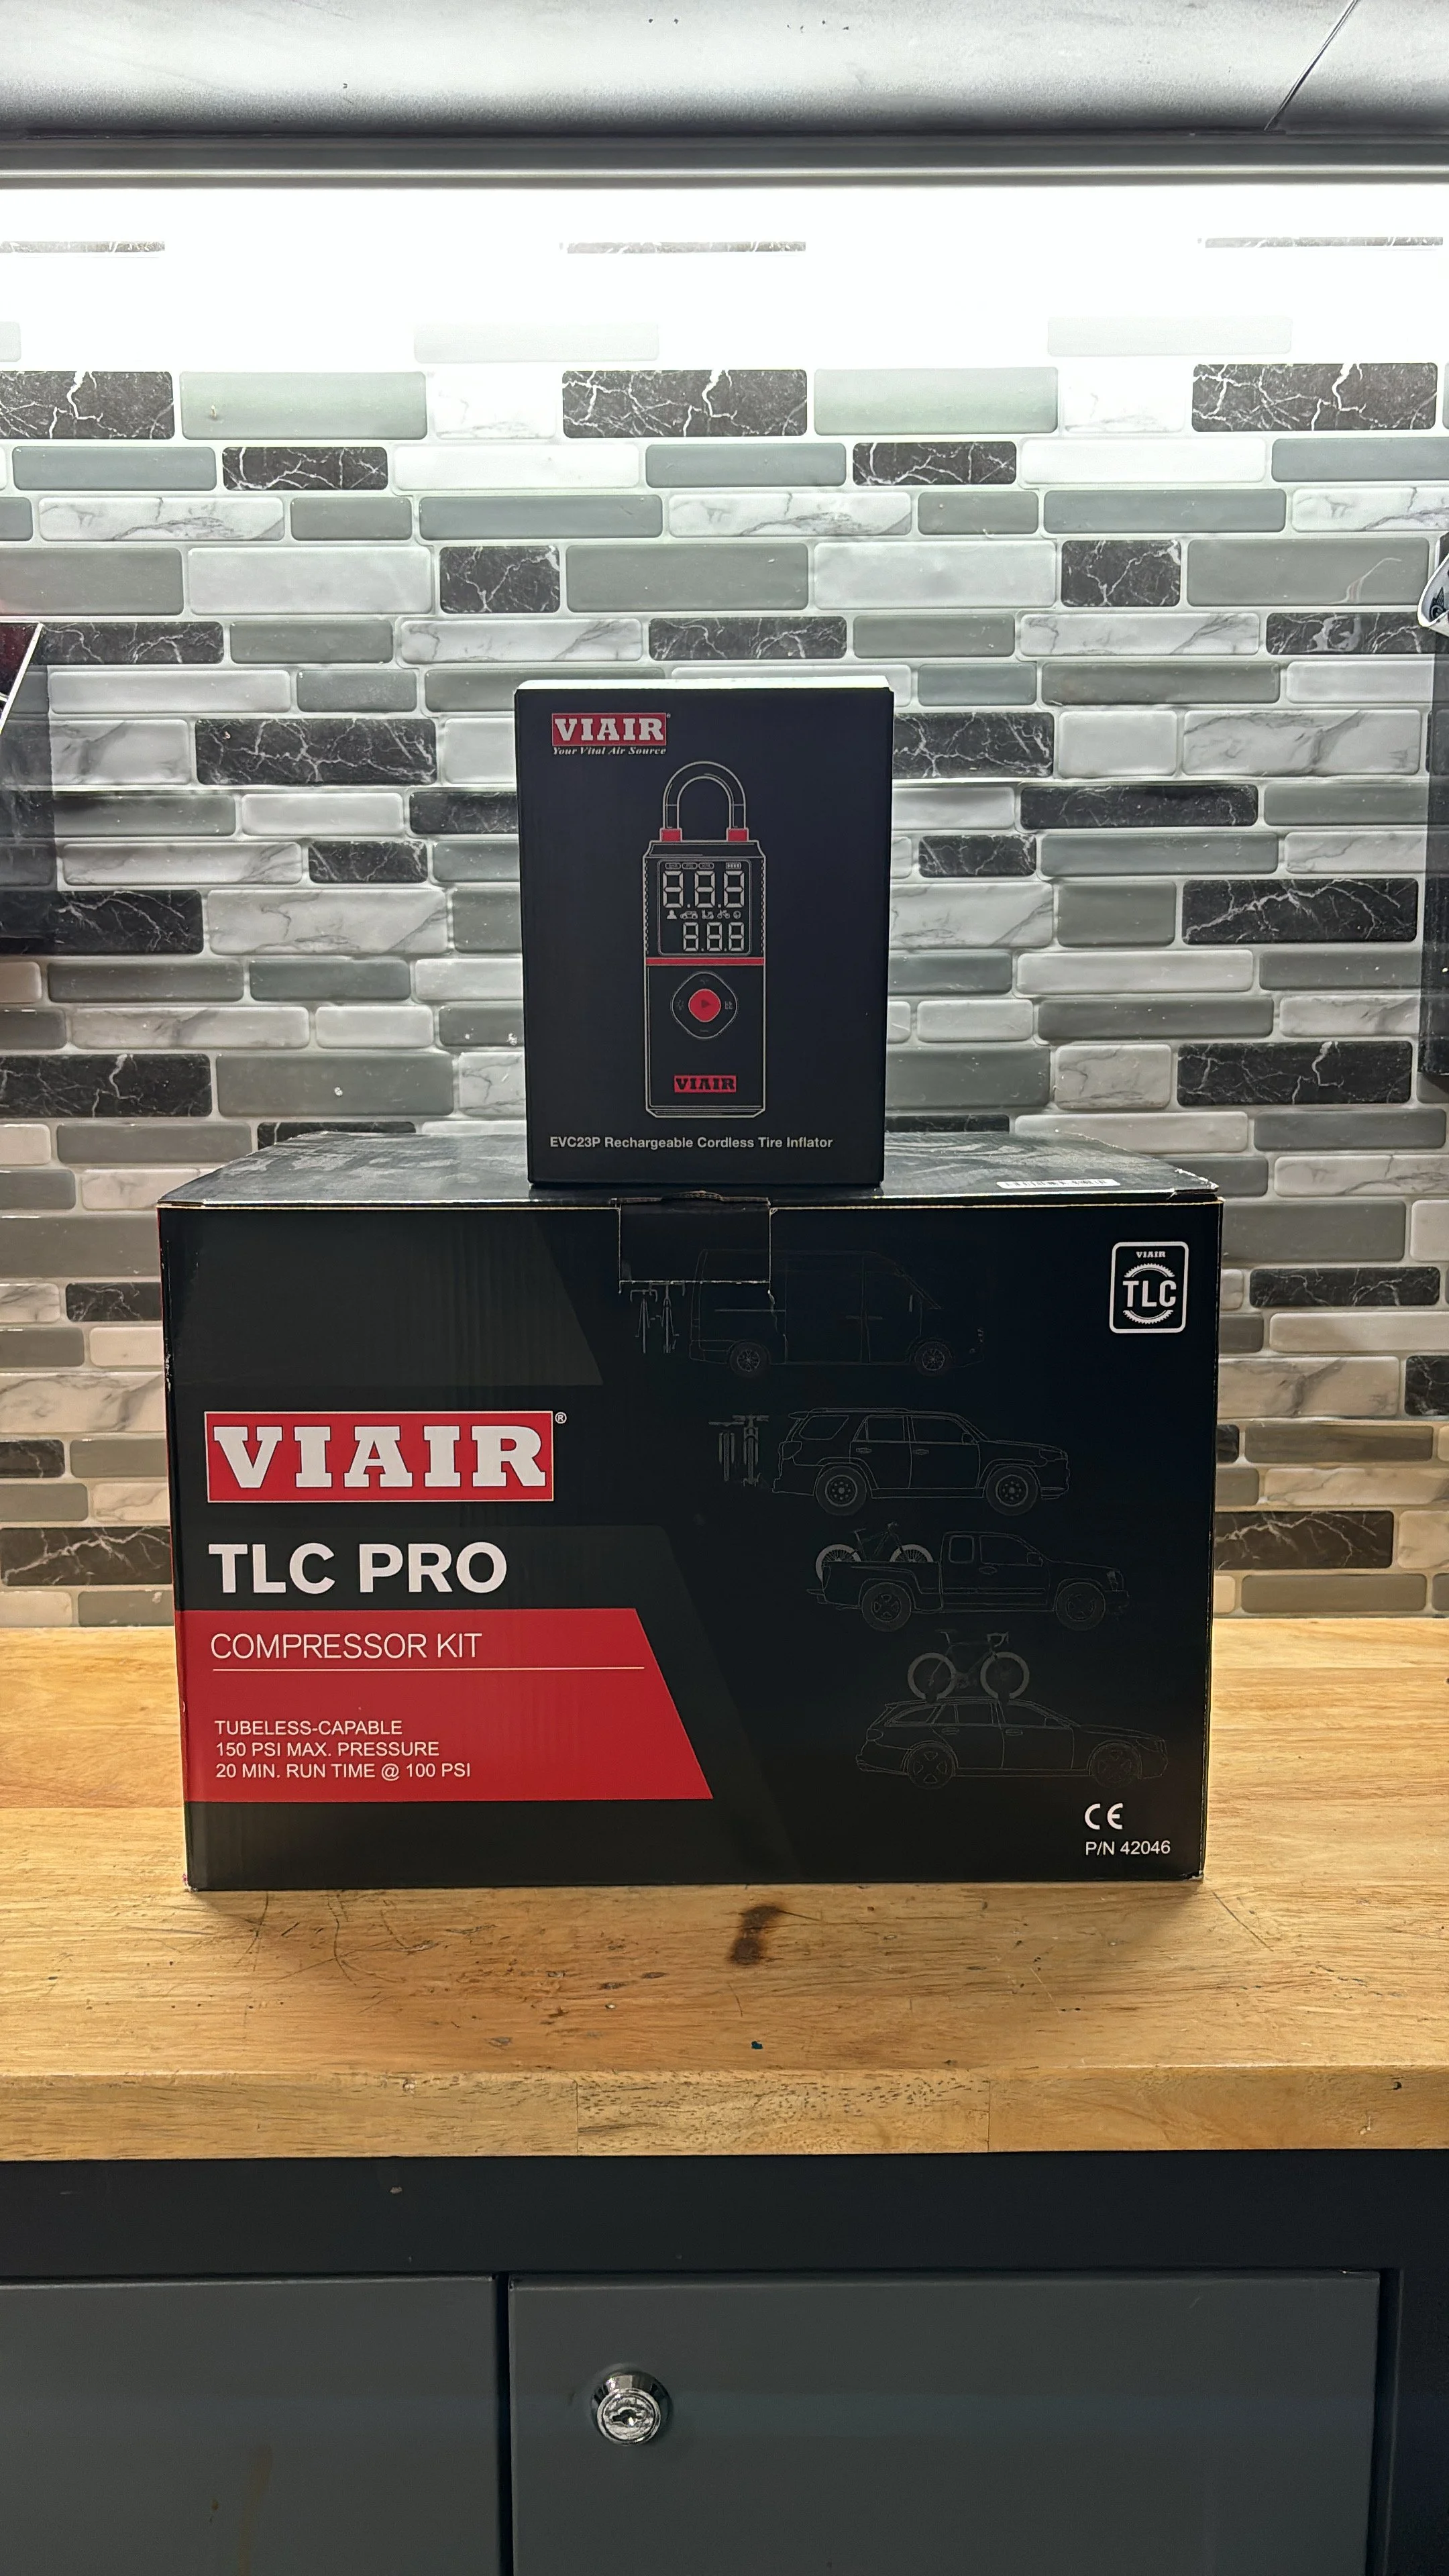
Exciting New Addition: Viar TLC Pro Compressor
I’ve been a bit tied up lately, but I’m thrilled to share a recent development in my van build. I’ve just received the Viar TLC Pro compressor, which I’m confident will be a game-changer for my moto and bike rides. This compressor will not only enhance my off-road adventures but also ensure I can handle deep sand by allowing me to air down my tires efficiently.
Having on-board air is crucial for maintaining optimal performance and convenience when 4-wheel driving. It’ll streamline the process and make my adventures more enjoyable. My next step is to figure out the power setup for the compressor. I hope to have everything installed in the next couple of weeks, and I’ll be sure to update you on the progress.
Update 21/9/24
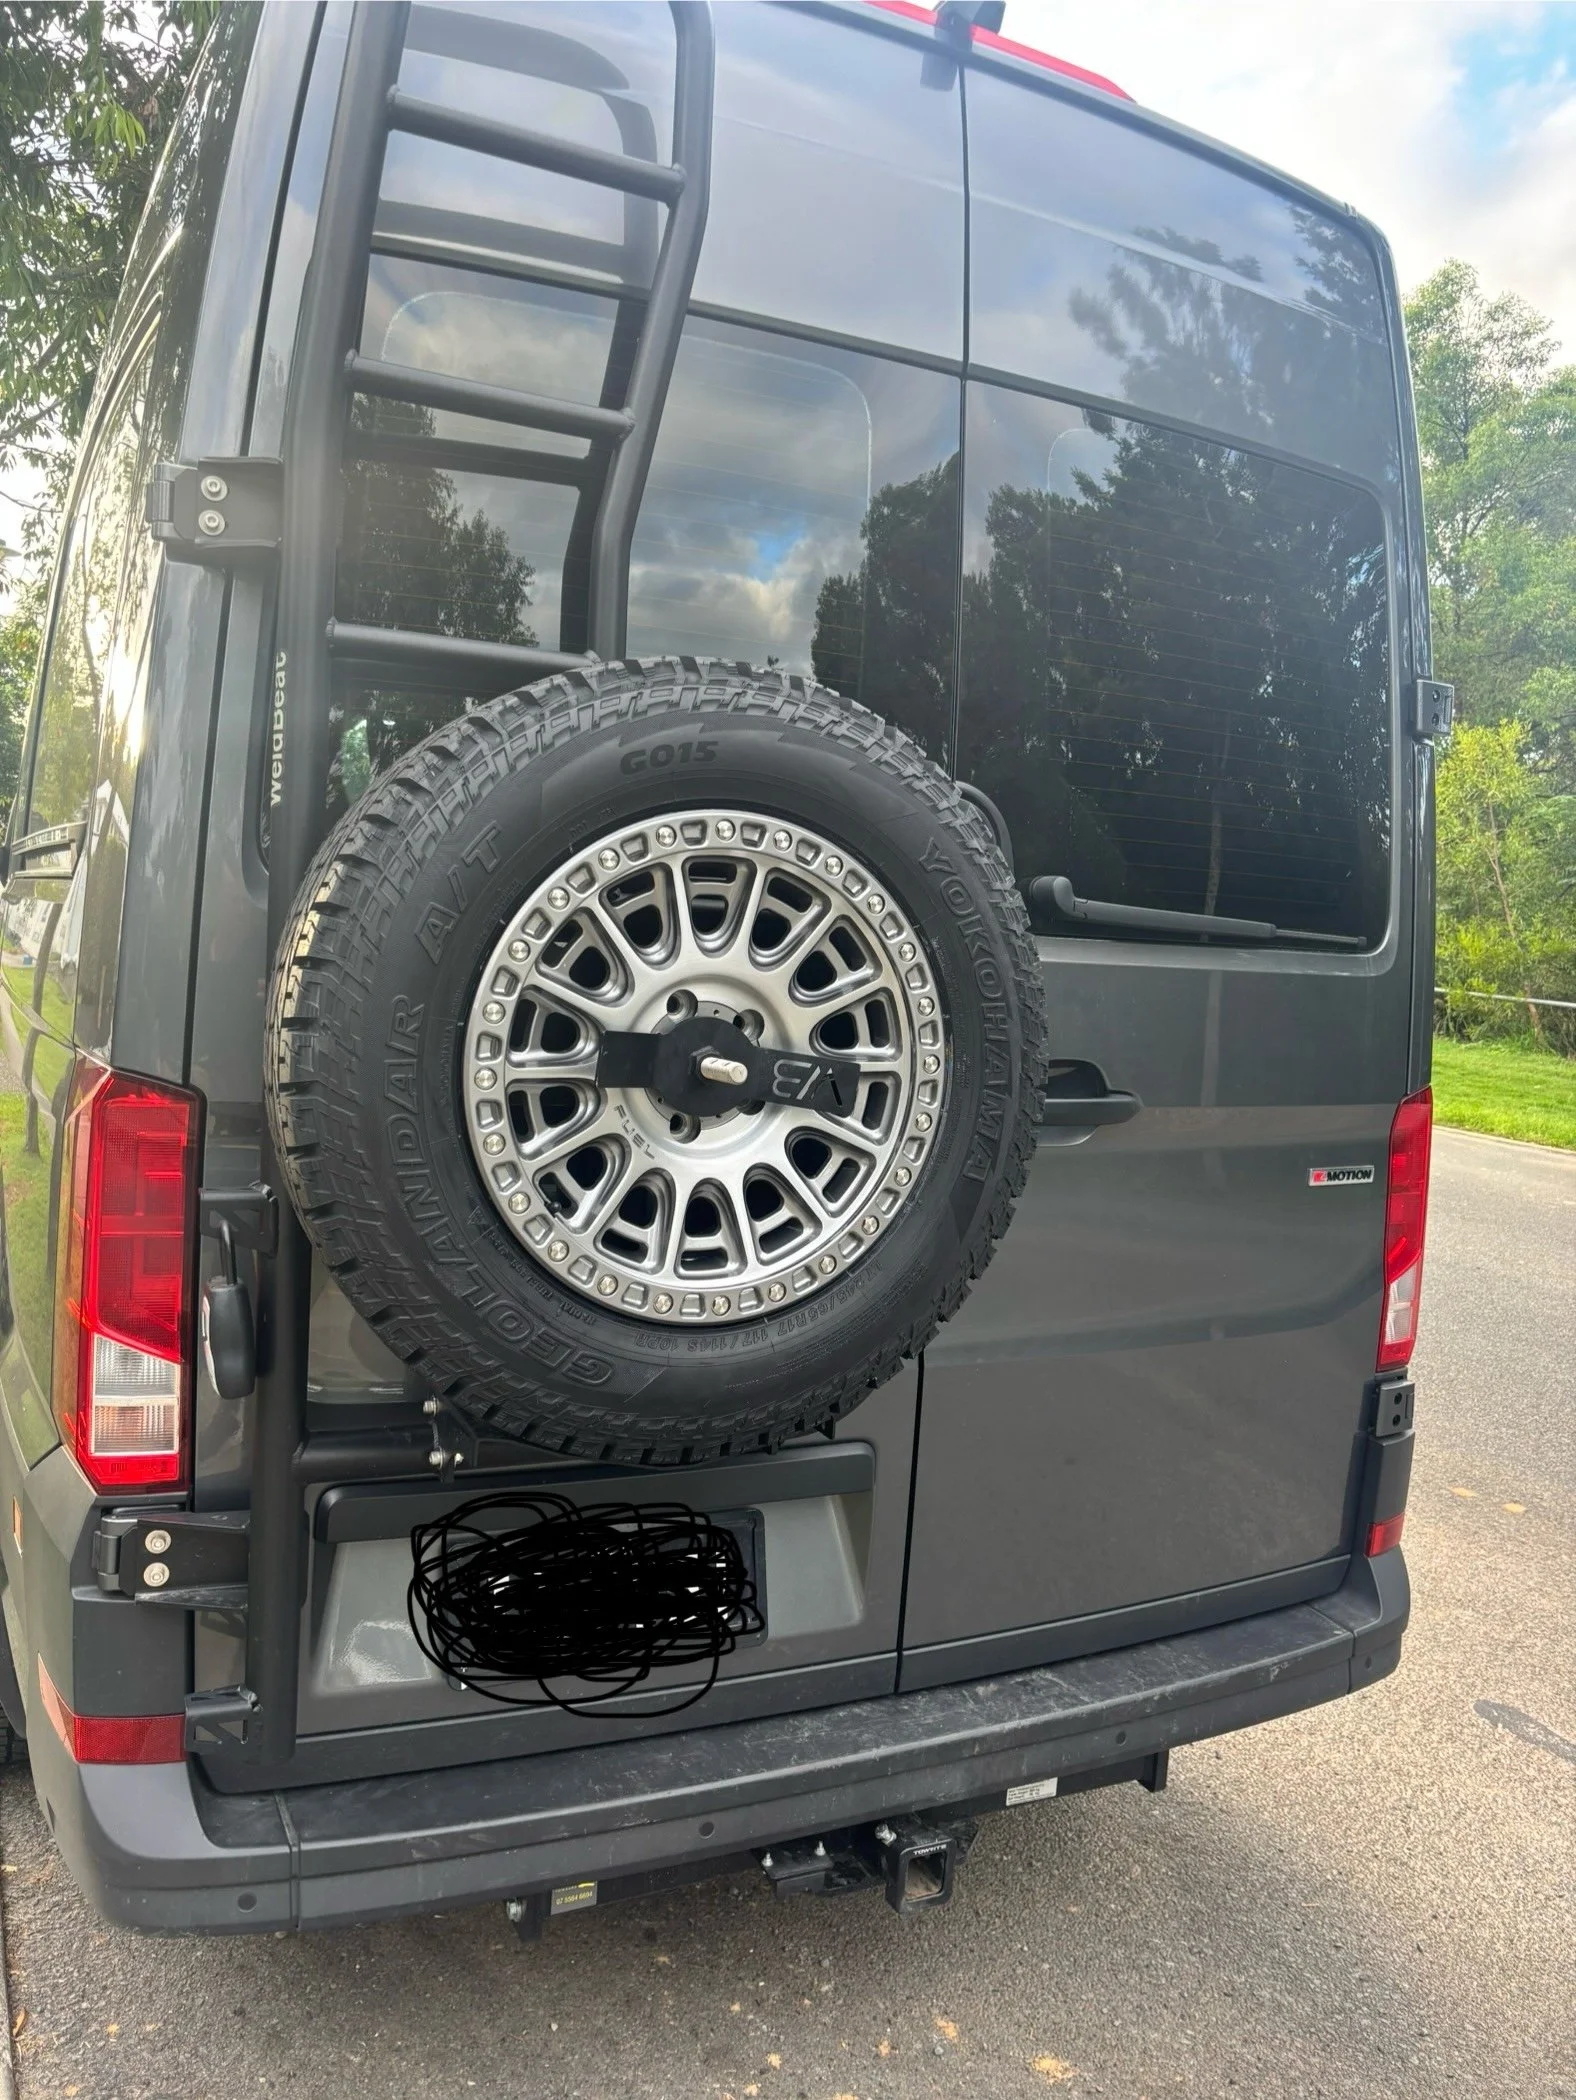
I have been a little slack on the build but it’s ok because I’ve been using the van plenty from motor to the beach etc. I still haven’t done the electrical system for lights, compressor and power but I did get excited and installed the Weldbeat ladder with spare tire mount on the rear door. Mason and I took a late afternoon and were extremely stoked with the outcome of the quality of the ladder. I have actually done a review on the ladder it’s self so click HERE for a more in depth review of the product. I had a torsos ladder on my last van and it was made out of mild steel and it was heavy and the overall install wasn’t as good as the Weldbeat ladder so I was stoked!

I did a get a little detail done to the L-track but I don’t have a pic but when I get back from my business travels I will show you my black powder coated L-track. It really tied the look of the interior together. The below picture is what it looked like before the powder coated L-track was installed.

Update 18/2/24
I’m a Method Race Wheels guy but they don’t have the crafter wheel available right now so I was lucky enough to get connected with Michael Hart from Bob Jane T-Mart in Nerang, QLD and he took great care of me on a wheel package so I recently swapped out the stock wheels for a set of Fuel 17x9s, paired with 245 Yokohama all-terrain tires, and I’m really happy with how it’s turned out. The Fuel wheels have a great look—different from the usual black or matte finishes you often see. They add a nice, tough vibe to the Crafter, giving it a distinct yet balanced look without going overboard.


The Yokohama all-terrain tires are a solid match, offering a smooth ride both on the road and off. They give me the grip and durability I need, and the Fuel wheels provide a nice mix of strength and style. This setup not only boosts the van’s off-road capability but also adds a bit of a fresh, rugged aesthetic. It’s exactly the kind of upgrade I was after.
Thanks to Michael Hart from Bob Jay Tmart Nerang for getting it all sorted. More updates to come as I continue working on the build.
Product installed
Flooring Fabric and foam , Seat and Ply Floo,r L-track Brace for L-track, Weldbeat Ladder and spare tire mount, Fuel Wheels, and Yokohama tires,
Products to come
Weldbeat Ladder, Skid Plate, Rack, Plastic knob for L-track Baja Designs dome light Baja Designs hood lights RB Components stuffer Bag